LilyBakes

Look for us on Facebook! LilyBakes. Please "Like" us today!

Wednesday, July 30, 2014

Salad of the Day-Garden fresh corn, tomatoes and Zucchini


Salad of the Day!  
I am growing corn this summer-but it's not ready yet.  So I bought a few ears from Kroger.
I boiled the ears for about 3 minutes and then cut the kernels off the cob.

I chopped a tomato, zucchini (from my garden!) and some avocado.
For a little dressing I'm going to use the left over Creamy Vinagarette Dressing I made a few days ago. 


I also added some chopped walnuts! I am noticing that I like the same flavors over and over. When I make one thing-it creeps into another dish. That's OK! If you love it- you're more apt to eat it!!


Enjoy! What is YOUR favorite salad combination?


Monday, July 28, 2014

Rotini Pasta with Creamy Vinagarette Dressing


Roniti Pasta with Creamy Vinagarette Dressing


Start off with boiling water and making pasta. My favorite pasta is Rotini. It's quick, easy and really grabs onto dressing. Once you have the water boiling, add in the pasta and cook for 10 minutes. Drain and place in a bowl for dressing. (Check your brand's directions for the correct timing.)

This dressing is made in less than five minutes!

Here is where I got the original recipe:

The ingredients are: 

  • 1 can (15 ounces) chickpeas (garbanzo beans), drained and rinsed
  • 5-6 cloves garlic, minced
  • 4 tbsp Dijon mustard
  • 3 tbsp balsamic vinger
  • 1/2 cup extra virgin olive oil

These ingredients go into a food processor. Blend well.


This recipe will yield about 2 cups of dressing. Mix according to taste with the salad.
Make sure to use an airtight container to save the rest. Or, take some to work to share with your friends!


For the Pasta salad-I also added chopped walnuts, tomatoes, and parsley.


Voila! The entire process took me longer to blog than to make! 
:)
Enjoy!


Variation #2

Add chopped Zucchini, Kalamata Olives and Cilantro to the above salad. AMAZING!


Tuesday, July 22, 2014

Deviled Eggs!


In every family it seems there is one person designated to make a certain dish, appetizer or dessert for family gatherings. In my family, I am in charge of Deviled Eggs. I doubt there has been a single holiday, birthday, or event that did not include these yummy treats.

Today, for work I am bringing two trays for a luncheon to raise money for one of our own suffering from breast cancer. (Annie Fannie-I hope you are there to enjoy one. )  

After I had made two trays I decided to photograph a few and share with you my "How to" tips. Some ideas have been culled from Pinterest and the rest I have perfected over the years.
First I must say I don't have exact measurements. It's more of a "to taste" kind of thing.

Here goes: 

First, in a pot put eggs and cover with water. (About a 1/2 inch above the eggs.) Put them on the stove and turn to High. Once the water gets good and boiling (I wait about 3 to 4 minutes of full boil) Then turn OFF the heat and put on a lid. 

After about a half an hour, take the lid off and pour out the hot water. Fill with COLD water and ice cubs. Put the lid back on and SHAKE the crap out of the pot. (Hopefully you have a good fitting lid so you and your kitchen stays dry.)  This will loosen the shells and make peeling much easier. 
Don't shake too hard or too long that you break open the eggs-just enough to crack the shells.

Peel, cut in half and place whites on the serving dish and yolks in a bowl.

In the bowl, I add Mayo (lots of mayo) I use Organic Mayo. (Don't use Low Fat or Fat Free-yuck! If you are making them for others buy the best tasting Mayo you can. It makes a difference!!)

Mayonnaise,
Yellow Mustard
salt
pepper
Paprika
Dill 
and my "secret" ingredient- Sweet Pickle Relish.

Some people add sugar but I don't. The Sweet Relish adds sweetness AND crunch. It gives you more for your money. People like texture. It also adds more moisture so you can use a little less Mayo!
It's a win win!!

So there you go. Hope you enjoy. What's your favorite Deviled Egg recipe?


Monday, July 21, 2014

Summertime Lily Belle

This is Lily Belle. (One of her MANY nicknames: Lily Dilly, Baby Love, Lillers, etc.)
Today I asked if she wanted to go for a walk. That simple question prompted a whole new outfit.
I waited while she put together a special "walking outfit" complete with her Easter dress, sparkly shoes, a hair bow given to her by Grandma Sandy and of course, flower sunglasses.

As we meandered up the street (ah, the joys of walking with the Tot) she decided to lay in the grass.

It was very cute. The following pictures resulted...
Too cool for summer

My photographer friend, Adam said,  "This is the culmination of four years for Lily pics."
It's a pretty rad compliment coming from him!  www.adamalonzo.com/photos

However, this is all Lily! She is the one picked out the outfit, the accessories, and the shoes. It was also all her idea to lay in the grass. I was just smart enough to have my iPhone with me! 

Sassy Tot


What a kid. She makes my every day so fun. I am so so blessed.


UPDATE:  We created a new outfit out of my nightgown….Had to add…

Monday, July 14, 2014

Veggie/Pizza Calzones

Have you seen this website?
http://www.superhealthykids.com

Each day they share healthy recipes that your kids will love. I like to try their great ideas.
This is one I made recently- mini Calzones. I was intimidated at first but WOW is it easy!
I love tackling a new recipe and at first thinking it'll be so hard but then at the end of it realizing-I can DO that!!  That's one of the fun parts of baking-learnng you can do so much more than you thought.

Super Healthy Kids

This recipe creates Veggie Calzones but I made a few of them "pizza" for The Tot.. She ate them right up! I liked both versions-veggie and pizza!


Here's the recipe: Whole Wheat Veggie Calzones
From Super Heathly kids

Whole Wheat Veggie Calzones


Instructions

  • 1 pkg yeast (or 1 Tablespoon of yeast)
  • 1 Tbsp sugar
  • 1 cup warm water
  • 1 tsp salt
  • 3 Tbsp olive oil
  • 1 1/2 cup white flour
  • 1 1/2 cup whole wheat flour
Filling:
  • 1/2 zucchini
  • 1/2 green bell pepper
  • 1/2 yellow bell pepper
  • 1/2 cup mushrooms
Place all veggies in a food processor and pulse until chopped finely.   Add
  • 1/2 cup shredded mozzarella cheese
  • salt and pepper to taste
Instructions
  1. Combine yeast, sugar and warm water and let set for 5 minutes. Mix remaining ingredients and then add yeast mixture. Let dough rise, in a warm place, for about 30-45 minutes.
  2. Roll out a small portion of the dough at a time,  for mini calzones we use a golf ball size.  Roll or press out. Fill middle with filling, thin layer marinara sauce, and a scoop of veggies.  Fold calzone in half and then crimp edges with a fork. Set on baking tray.  
  3. Whisk 1 egg white in a small bowl. With a pastry brush, brush the top of the calzone.
  4. Bake at 425 for 10-15 minutes until lightly browned. Test to make sure dough is done baking by tapping on it. It should sound hollow.
  5. Let cool slightly and serve with marinara sauce for dipping.
Yeast, sugar and warm water. Rest for five minutes

In a glass bowl (I just recently learned that when baking bread, you should use a glass bowl-not metal! I had no idea. Luckily, my husband had just bought me this Pyrex bowl so I was ready!)


Salt, olive oil, white and whole wheat flour

The above step after mixing in the olive oil

Add in the warm water, sugar mix
Set aside for to rise in a warm place for 35 to 40 minutes

The recipe calls for different veggies. These are what I had on hand. 

While the dough rises, get your veggies together. I had on hand carrots, onion, purple cabbage and a fresh zucchini from my garden.  Chop some veggies and then puree them in a food processor.

Mix veggies in a food processor


Pull out a golf ball sized ball of dough.  Roll out on some flour to prevent sticking.


Add some Marinara, shredded Mozarella and the veggies.


Fold over and crimp edges with a fork.

All lined up and ready for baking.


Some versions were just the Marinara and Mozarella Cheese for a pizza version.


Yum!!  The recipe calls to bake for 10 to 15 minutes. I guess my oven is slow because I had to bake for about 15 to 20.  Even these should have been baked a little longer. ALSO, I missed an important step.  Before baking coat with an egg wash. The egg wash takes down the flour on the outside.  Also, anohter improvment would be to add a lot more veggies. They can hold more filling than I used. 

I can't wait to try them again and to add different types of ingredients. 
I hope you try them too!


Lily Belle and Coco enjoying a Pizza Calzone in the garden.  (Well, Coco is busy monitoring for crumbs or an inattentive Tot….)


Friday, July 11, 2014

Salad of the Day-Chopped Salad!


Last week I got a hankering for a chopped salad.  Tiny, cubes of bite sized freshness. Easy to eat, easy to love. So, I did what I always do-Googled!  I went to Google Images looked for photos of Chopped Salads to inspire me. I found not only a salad recipe but it also had the recipe for a Creamy Vinagarette Dressing. I immediately IMed my husband, "Do we have Vinagarette?"  
"About four bottles…." was his reply. YES!  I knew what I was making the next day!  It was so good (and made so much dressing) that I made it again two days later. Here is my second attempt.

Here's the original link/website: Chopped Salad and Creamy Vinagarette Dressing


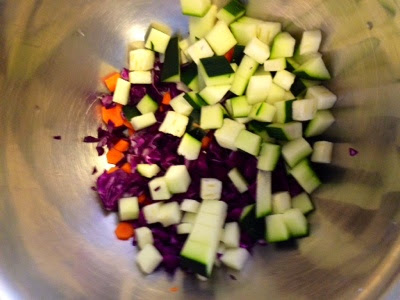
I made Veggie Calzones (check next post) and these are the veggies I used for that recipe. While I was cleaning and chopping veggies for that- I chopped a few extra (Zucchini from my garden, carrots and Purple Cabbage) for a salad.


I LOVE Red Leaf Lettuce. I've heard the darker the lettuce-the better it is for you. I chopped some up fine for my yummy salad.


Here it is veggies only.


Creamy Vinagarette Dressing. Here is the recipe link again. I love cooking things that I already have the ingredients on hand! Nothing worse than picking out a recipe and you have to run to the store for that one obscure item!!  I will tell you this dressing gets better with time. When you first dress the salad, it may seem strong. But I packed this for my lunch and by the time I ate it-WOW it was yummy!!


Gotta love the bright and cheery colors!!  The original recipe calls for adding pasta. I did the first time I made it and I think it really adds to the dish. I will make sure to add pasta the next time I make it…. tomorrow….. (that's not too soon is it?) naw!!!!

Monday, July 7, 2014

Gardens, Blooms and Elephant Ears!


Front garden (left)

This is one of my flower gardens in the front of the house. (There is one on either side of the front door)
The gardens in the front are a mixture of Perennials and Annuals. I love Annuals like Sweet Potato Vines, Asparagus Ferns, Spikes, Snapdragons, Vincas, Alyssum and Coleus. I'm trying to have a good mixture of Perennials that can add savings by not having to buy them every year. The back yard garden I try to keep only Perennials so that one is easier to maintain and grows each year. 

If you know what this is-please share in the Comments!

I found this Perennial and lost the tag somewhere. I don't know what it is but it's growing like crazy! I DO wish it could stand up taller but they fold over under the weight. It's a great Perennial and I hope to split and share it this Fall to the back garden.

Snapdragons
Snapdragons! This is the best year I have ever had with Snapdragons. Usually they are skinny and don't do too much.

Large corner pot

Here is one of the four LARGE pots I plant and station on the four corners of my porch. Sweet potato vines, Pansies, a spike and Alyssum.

Coleus, Sweet Potato Vine and a Begonia
This little pot started off with a tiny Coleus (the red leaves) and one Sweet Potato Vine. I love how the Sweet Potato vines cascade over the railing!


This is the back side of the same plant. I tucked a sweet little Begonia in there.  
Calduim

This is my pride and joy!  I bought a Caladium last summer. It didn't do too much. This year, I noticed the leaves browning and realized it's a SHADE plant. Once I brought this one onto the porch it grew and multiplied like crazy. I love the contrast of the red and green!


Elephant Ears

For the first time I tried Elephant Ears. These took so long to sprout I thought surely they were duds. Then about 4 weeks after I had planted them, leaves came up. After that it was a few short weeks to this.
I watched a YouTube video about how to winter them (cut off all leaves and stems, trim down to the bulb and store in basement or garage. Then, replant in the Spring)  I intend to winter them AND buy even bigger versions next summer!   

Zinnia

This is from a Zinnia seed! I randomly put some seeds around the garden to see what would happen. This came up and I wasn't even sure what it was. Then KABOOM this amazing, vibrant flower appeeard. Imagine my glee to discover a Zinnia! 

Large pot in back, Begonias and one Hosta

I tucked a red Begonia paired with an Asparagus Fern next to a Hosta on the porch. They get enough shade to flourish and I love to look at them while sitting on the porch.

Lazy Summer afternoon

Coco enjoys a beautiful summer day.


My porch.

My porch. It gives me great happiness to sit here and look at all the beautiful plants that I have planted, watered and nurtured!


Tuesday, July 1, 2014

Simple meal for kids-Pasta and Broccoli


My Tot is 3 years old. She would eat crackers, Cheez its, and popsicles all day long if I let her. Daily I try to get some real, organic fruits and veggies into her. (It's a challenge but I try each day!!)  She LOVES broccoli and pasta so this is a staple meal for her. Luckily, her brother Calvin (15) loves Broccoli too so I'm good to go.  Here's how to make it.

Pasta with broccoli and carrots
8 to 10 minutes for fresh, easy pasta!
I start with boiling the pasta. I love this Organic Rotini by Simple Truth. The shapes are easy for little kids to get their hands on. It's EASY to make and doesn't require trying to get spaghetti noodles bent just right into the pot. I usually make a little extra and take it to work for my dinner!

I throw broccoli and carrots or sometimes cauliflower in the vegetable steamer. 
When both the pasta and veggies are done, I toss them in a large bowl with butter and grate fresh Parmesan cheese on top. VIOLA! Lunch is done and they LOVE it!


Digging in to some yummy pasta!