LilyBakes

Look for us on Facebook! LilyBakes. Please "Like" us today!

Friday, April 25, 2014

Winging it with Couscous!


My dinner!

I have about four boxes of Israeli Couscous in my pantry and I decided today was the day I use some of it!!  So I made this lovely Couscous salad!  I can't wait for dinner! I started with this recipe and then just went on my own based on my available ingredients. Greek Israeli Couscous salad


Israeli Couscous from Trader Joe's

Ingredients:

Prepare the couscous according to the package
1/2 a chopped cucumber
1/4  finely chopped yellow onion 
1 stalk celery chopped
1 sprig of Cilantro chopped 
3/4 tablespoon of Extra Virgin Olive Oil
3/4 tablespoon Apple Cider Vinegar
Sea salt to taste

Mix and let sit for a few hours for the flavors to meld. The larger shaped couscous almost POP in your mouth. Such a light and delightful dish. It would compliment Steak beautifully!  


Tuesday, April 22, 2014

Bread-No Knead vs Kneaded


No-Knead bread

Here is where I saw the recipe originally-No Knead Bread recipe
I pinned it to Pinterest and I revisit this recipe over and over. It is not a difficult bread to make but here are three important points-
1. You need a covered dish like a dutch oven or a covered casserole dish that can go into the over at 450 degrees for an hour
2. Prepare the dough overnight. It has to sit for 6 to 8 hours so the easiest thing to do is start it at bedtime and baking it in the morning
3. Use BREAD flour. Regular flour doesn't work very well. In fact it's stringy, sticky, hard to work with and doesn't rise enough. Make sure you have Bread Flour.

(The following recipe is copied from Steamy Kitchen)

ingredients:

3 cups bread flour (I like Harvest King bread flour)1/4 teaspoon instant yeast1 teaspoon fine table salt (or 3/4 tablespoon of kosher salt)1 1/2 cups warm waterCovered pot (five-quart or larger cast iron, Pyrex, ceramic, enamel...something that can go into a 450F oven.)

directions:

1. Mix dough: The night before, combine all ingredients in a big bowl with a wooden spoon until the dough just comes together. It will be a shaggy, doughy mess. Cover with plastic wrap and let sit 12-20 hours on countertop.
2. Shape & preheat: The dough will now be wet, sticky and bubbly. With a wet spatula, dump the dough on a floured surface. Fold ends of dough over a few times with the spatula and nudge it into a ball shape. You can use your hands if you like, just keep your hands wet so that the dough does not stick. Place a large sheet of parchment paper on counter. Plop your dough onto parchment paper. Lift parchment paper up with dough and place into a large bowl. Cover bowl with a towel. Let it nap for 2 hours. When you've got about a half hour left, slip your covered pot into the oven and preheat to 450F.
3. Bake: Your dough should have doubled in size. Remove pot from oven. Grab the ends of the parchment paper and lift entire wobbly dough blob out of bowl into pot. Doesn't matter which way it lands. Shake to even dough out. Cover. Bake 30 minutes. Uncover, bake another 15-20 minutes or until the crust is beautifully golden and middle of loaf is 210F. Remove and let cool on wired rack. If not eating right away, you can re-crisp crust in 350F oven for 10 minutes. Best way to eat it? Smear a warm slice with some good butter (Kerrygold and Lurpac are both found in your grocery stores, usually on top shelf)


Pizza porn! After the bread was all baked and cooled, I cut two thick slices. I covered in pizza sauce, and mozzarella. I added cut up Kalamata Olives (obsessed with those-btw) and fresh chopped Cilantro.
Sprinkle with a little Oregano and now that I think of it-I should have added some Parmesan Cheese!
Bake in toaster oven till warm and cheese is a little brown and bubbly!


My lunch!! 


White Loaf Bread
Here is the recipe:  Classic White Bread


My two loaves both baked today. Which is better? The White Loaf Bread is sweeter and more dense whereas the No Knead Bread has a lighter bread but lovely golden crispy, crunchy outer crust. Both are excellent for eating!  

First Time Pizza Dough-A Failure?


Homemade pizza-It has to be easy.  Right? Well……
I borrowed a recipe from my favorite baking cookbook. (for now-I have an amazing one on it's way to me from Amazon right now!!)


Here's the book. You can get it here : kids Baking by Williams-Sonoma
Here is the recipe from the William-Sonoma website: Pizza Dough recipe


Ingredients: 
all purpose flour- 2 1/2 cups plus extra for kneading
Rapid-rise Yeast-1 package
sugar- 2 teaspoons
salt- 2 1/2 teaspoons
olive oil-2 tablespoons


In a large mixing bowl use a wooden spoon, mis flour, yeast, sugar and salt.
Add warm water- must be between 115 and 125 degrees Farenheit. (Use a thermometer to check the temperature)  When water is the right temperature add to the mixture along with the Olive oil. Mix till a rough, shaggy dough forms.


Cover clean work surface with extra flour to prevent sticking


Kneading. This is the "hard" part. I usually turn on the TV or music to distract myself because otherwise 10 minutes can feel really long. Keep flour on the area where you are kneading and also on your hands to prevent sticking.
Knead for about 10 minutes until the dough is smooth and no longer sticky.


Lily wanted to help so I gave her a small piece to knead with me.


Gather dough into a ball. Wipe out a bowl with Olive oil or vegetable oil. (I prefer Olive oil) and place ball in the bowl. Cover the bowl tightly with plastic wrap. Seat aside in a warm spot and let rise for 45 minutes until doubled in size.


This is after 45 minutes. You poke to see if it's done. If the indent stays (as shown) the dough is ready. If it springs back then let it sit for 10 more minutes.


Once done, flour clean work area again and roll out dough (flour your rolling pin so it won't stick) into a large pizza pie shape.


Add sauce!


Add toppings. We didn't have an mozzarella so I used mozarella slices, string cheese, and Babybell individual cheeses sliced thin. I topped with salami (reasoning that it's almost, pepperoni-right?) and some cheddar cheese. I also added Oregano for seasoning and cut up a few Basil leaves.


The verict-meh
I think I had too much salt. I prefer a sweeter pizza dough so I think I might use less salt next time and maybe a little more sugar. The dough was pretty thick so I would roll it out thinner next time. Also, I definitely would add more sauce and for SURE wait until I had real mozzarella!!  So overall, was it a failure? Well it was all eaten so I think no. I'm going to call it a learning experience!  I WILL try it again.
On the good side-the Basil-YUM!!


Thursday, April 17, 2014

One? Bean Salad

I have been trying to get more beans/legumes. I thought maybe a Three Bean Salad would be nice so I found this recipe: Three Bean Salad. I had never tried "Great Northern Beans"  The recipe calls for Cannellini beans but I looked it up http://www.wisegeek.com/what-are-great-northern-beans.htm and found these can be used as a subsitute. Plus! Kroger (our local grocery store chain) had a sale on beans 10 for $10!  

I made the recipe just as it says and discovered that I really just liked the Great Northern Beans!  They are a nice delicate flavor, not waxy or grainy and don't have a tough skin. I even set aside some to add in smoothies for protein.


I decided to try and make the salad with just ONE bean. Feel free to add the other beans!


onions finely chopped


rinse the beans


finely chop parsely


mix


add salt, pepper, a little sugar, a little apple cider vinegar and oil. Toss!
Set in the fridge for a few hours for the flavors to meld and enjoy!

Tuesday, April 8, 2014

Strawberry Dutch Baby Pancake


I am REALLY excited about this recipe! I have been eyeing it for several weeks in my "Organic Family Cookbook"  (Get the book here: Organic Family Cookbook)  I was really hesitant though because the recipe calls for a cast iron skillet and we don't have one. (Hello!  I should send my husband to look for one at the Goodwill! He can find anything!)  I had some delicious looking strawberries and so I finally decided to go for it. 


One of my favorite cookbooks-GREAT photos!
Finished recipe as shown in the book. Can I duplicate this?


The recipe is really easy.  Preheat your oven to 475 degrees and place a skillet inside to heat up. (If you don't have a cast iron skillet, make sure your skillet has a thick base and NO plastic handle) While that is heating up, put 3 eggs and 3/4 cup of milk into mixer and mix till frothy.


Add in the dry ingredients: 1/2 cup of unbleached all-purpose flour and a pinch of sea salt and mix.


Pull skillet out (make sure and use an oven mitt…..You would think this is common sense but I have been known to burn my hand on a handle or two…..)  Add 2 tablespoons of unsalted butter and allow to melt.


Pour the batter into the skillet and place in oven at 475 degrees for 12 to 15 minutes.


While the Dutch Baby (don't you just love that!) pancake bakes chop up about a cup of strawberries. (Or blueberries, or blackberries or raspberries or even a combination! Whatever you have!) Add fruit and 2 tablespoons for Raw Agave Nectar to a sauce pan and warm.


Pull your beautiful Dutch baby pancake out of the oven!


Top with strawberry mix and top with a little powdered sugar! Isn't it lovely!/!


Now for the toddler test. Will Lily Belle like it? 


I think it's safe to say she LOVED it. Together we devoured the pancake. I can't believe how EASY it was to make. You can even change it up to a savory pancake and top it with salsa, a chicken dish or some tasty veggies. I can't believe how BOSS this is! Imagine pulling this out for company! They will think you are a chef!  I love it. I like it so much I might go make another one RIGHT NOW!


Saturday, April 5, 2014

Zu-Corny Biscuits via Trader Joe's Cookbook

Did you know there are SEVERAL cookbooks out that feature food from Trader Joe's? Many books will tell you what to buy at their fun store and then how to turn those into a yummy meal, snack, sandwich or even something to pack for lunch!


I found this book:  Trader Joe's Pack a Lunch at the library. Hmmmmmm I love Trader Joe's (though I sure wish they had a location closer to us-both locations take planning to go there.)
I found a recipe called "Zu-Corny Biscuits"   As in-Zucchini and Corn Biscuits. Wow! This combines three things that I love: Zucchini, Corn and baking biscuits!!

Gotta try this!

 Dry mix


Grate zucchini and add it into the "wet" mixture


Wet and dry combined.

Here's a video of me showing the various ingredients:
(And the Book!)


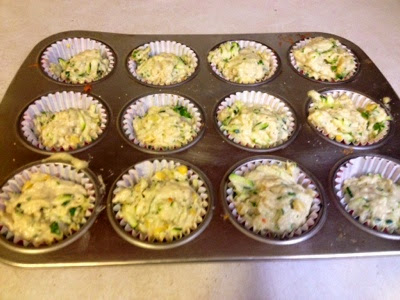
Before I pop them into the oven.

Tips- make sure you have the correct oven temperature! I had the oven set at 350 degrees. However, the recipe calls for 400!  It took twice as long! I couldn't figure out WHY they weren't getting done.
Oh! Yeah, read the recipe!


Here is one of the Zu-corny Biscuits. They have been an easy, take along type snack the past two days. I think I will make it again and if so I will: 
1. Get the cheese recommended in the recipe. Muenster is too mild and the flavor is completely lost.
2. Use more onions, more zucchini and more kale. And more corn too! I would definitely UP the veggie factor. 
These are fast and easy to make and would be PERFECT for a brunch or work event. You can easily make them ahead of time (but let's face it who doesn't love that "hot out of the oven" taste? 
They keep well and would definitely work well packed for lunch. (I should know! I packed two for myself at work!!)  

Hope you try this recipe. 
:)

Thursday, April 3, 2014

Stellar Blueberry Muffins!


Yesterday I didn't feel like blogging but I DID feel like making blueberry muffins. After they were done, and I ate one I knew right away I SHOULD have taken pictures to blog these delicious muffins.
So! In the shortest post to date- I am including this picture I took after they came out of the oven and the recipe: 


Don't miss out on these puppies!!


Recipe from "Babble, Courtesy of Disney"
www.babble.com

Sour Cream Blueberry Muffins (adapted from Smitten Kitchen by way of Cook’s Illustrated)
makes 10 – 12 muffins
1 1/2 cups unbleached all-purpose flour
1 1/2 teaspoons baking powder
1/4 teaspoon baking soda
1/2 teaspoon sea salt
5 tablespoons unsalted butter, room temperature
1/2 cup sugar
1 egg
3/4 cup sour cream or whole milk Greek yogurt
1 teaspoon lemon zest
3/4 cup blueberries
Preheat the oven to 375 degrees and drop liners into a 24 cup muffin tin.
In a small bowl, combine the flour, baking powder, baking soda, and sea salt, and set aside.
Use a mixer on low speed (with a paddle attachment for a stand mixer) to beat the butter until pale and fluffy, about 3 minutes. Add the sugar and beat 2 minutes more. Add the egg, scrape down the sides, and then add the sour cream and lemon zest. With mixer still on low, fold in the flour mixture in two batches. Use a spoon the fold in the blueberries.
Use an ice cream scoop and a spoon to fill the muffin cups, one good scoop per cup should do.
Bake for 25 – 30 minutes, or until a toothpick inserted in the center comes out with just a few crumbs attached. Cool for 20 minutes, and serve. Covered muffins should keep well for 2 days.