LilyBakes

Look for us on Facebook! LilyBakes. Please "Like" us today!
Showing posts with label Amazon. Show all posts

Saturday, January 3, 2015

BEST Homemade Buttermilk Biscuits

So if you have ever come over to our house for a meal or just to hang out-chances are I have made you Buttermilk Biscuits. I absolutely love to make them. My stepson, Calvin will knock down small children to get them. (Not Lily, but he did push the neighbor boy out of the way to get at the last biscuits! lol)

Over the last year I have been tweaking my recipe and techniques. I'm kind of shocked I have never blogged about these before. Here is the recipe I use and all my tweaks to make the most BEST Homemade Buttermilk Biscuits. Your family will want them over and over!!


I got the original recipe from my Williams-Sonoma Kids Baking Cook book.


This little book has some of my very favorite recipes that I use over and over again.
Here is the link to the recipe- Buttermilk Biscuits Recipe

Ingredients:
  • 2 cups all-purpose flour, plus extra for work
      surface
  • 3 tablespoons sugar
  • 1 tablespoon baking powder
  • 3/4 teaspoon salt
  • 6 tablespoons (3/4 stick) very cold unsalted
      butter, cut into chunks
  • 1 cup buttermilk
  • Directions:
Preheat oven to 400 degrees
Line a baking sheet with a Parchment paper. (This is my tweak-it gives the biscuits a "crispier" bottom which is my favorite part!)

Mix together the dry ingredients.
Cut in 6 tablespoons of COLD unsalted butter. 
This can be done by hand, with a food processor or with a Pastry Cutter like I use.


Keep cutting until the butter is down to small little pieces. (Don't overwork as you want the butter to not melt completely or be cut down to nothing. The chunks of cold butter is what makes the bisuits!!)

Next, mix in a cup of Buttermilk. I usually end up using a cup and 1/8th. (Enough to wet all the dough but not to be soupy.)  Pour out dough on a floured surface. I use a Silpat mat as it's the easiest to clean when done.  Add some flour on top and on the rolling pin. Keep all surfaces well floured as it's rather sticky.
Roll out the dough a bit.


HERE is the magical tip!  If you use nothing else- DO this!! I saw this on an episode of Diners Drive Ins and Dives.  FOLD over the dough and roll again. I end up folding over the dough 3 to 4 times. Don't roll it out too thin. Just fold and roll, fold and roll. THIS IS WHAT CREATES THE FLAKY LAYERS!!  I never knew this! 


Cut out biscuits. I keep my cuts about 1 1/2" to 2" thick. Place on parchment paper on the cookie sheet and brush with Buttermilk.


Bake for 18 minutes.  (You may have to gauge your oven's best timing-for mine I know to bake them for exactly 18 minutes.)


Serve with some softened butter and Apple Butter! (Or your favorite jelly)
Make some extras and save them for dinner. 
These are delicious with a little mustard, a slice of turkey and cheese. Or save them for breakfast and top with a fried egg and a slice of bacon. You cannot go wrong!!  I have even made Honey butter by putting 2 tablespoons of butter, honey and sugar in a Ziploc bag and mixing. Then, cut off a corner and use like a piping bag! (or you can pipe it out into a small sauce cup) 


I'm telling you these are BRILLIANT and if you have ever been to my house and had some-come again! We are rocking the Buttermilk Biscuits!!! 


Wednesday, August 27, 2014

Spiralized Zucchini and Carrots with Pesto

SO!  I was challenged to do the ALS Ice Bucket challenge by one of my best friends. (Have you done it?)  Of course you have to videotape yourself doing it. When I saw myself…..oh. my. word. It was time to face facts. I have gained a lot of weight since I stopped breast feeding. (over 10 pounds-which is on top of the 10 pounds I never lost after having Lily Belle so really I'm 20 pounds over my usual weight!)

Time to get serious. This may affect my cooking, baking and blogging (Who am I kidding? Of COURSE it will!!) However, I may not get to EAT the stuff I make but I still want to make food!

Here is one recipe that is "Weight Watchers Approved" (I joined WW Online-I need to PAY and be held accountable!!)

So I saw this recipe that someone shared and knew I had to recreate it. On the WW Tracker-most fruits and veggies are "free" which means they have no point value. You can eat them all day long!!

Here's the recipe I saw: Spiralized Zucchini and Tomatoes with Pesto

I bought a Spiralizer through Amazon. You can get it here: Buy Spiralizer!!


I changed the recipe a bit. I didn't want raw veggies so I actually steamed my Zucchini and Carrots for less than 10 minutes. (just long enough to make them less crunchy and the carrots a little bit sweeter.)

I then made Basil Pesto (using a lot less Olive Oil than I normally would!)
and tossed it all with some cherry tomatoes.

Simple, light and a meal that even WW would approve of!!


Saturday, June 14, 2014

Zucchini Pie via Mayim Bialik

I got this recipe from Mayim Bialik's Mayim Bialik (Blossom, Amy Farrah Fowler-TBBT) new vegan cookbook. I don't make it the vegan way but you can certainly replace the butter, eggs and cheese with vegan appropriate versions.

You can buy the book on Amazon: Mayim's Vegan Table Cookbook


1 cup of flour, 1/2 teaspoon of salt.


The recipe calls for whote wheat flour, but I prefer Whole Wheat pastry flour instead. It's more light and tasty!!


Cut up 6 tablespoons of COLD butter into the flour mix. Chop up butter into SMALL pieces.


Add 2 (ish) tablespoons of COLD water. Mix till becomes a ball.  You can then roll it out with a little bit of flour, or use your hands to press it into the bottom of a round pie pan. This usually covers the bottom of the pan and a little up the sides. If you want a full crust-add more ingredients to make more dough.


Smooth a little bit of Dijon Mustartd (maybe 1/2 a table spoon or less) and smear it over the crust. This is not a must but I found that it does add a little flavor that you miss without it.


Chop a medium onion. The directions suggest you sauté the onions first before adding them in but I've found that the hour baking time is good enough to get them soft but leave them with a little crunch.
Grate 2 zucchinis in a bowl. You can add most any veggie you want. Here I used zucchini, carrots and a little bit of broccoli. I have also made it adding purple cabbage for that bright purple color. 


Mix in two eggs, salt, pepper, and a cup of Mozzerella Cheese. I like to also grate some fresh Parmesan into the mix.


Fill the pie pan, bake in oven at 350 for about an hour till it's all cooked and browned as much as you like. You can even add an extra layer of cheese on the very top for more golden brown color.


Serve! YUM! Great for a breakfast, perfect for a brunch or anytime! I love to bring leftovers to work!

Friday, April 25, 2014

Black Cats get a Bad Rap


For five years I rented a duplex before I got married. A wonderful couple named John and Elizabeth  used to rent the same duplex before they moved out and bought the house next door. John is an artist and a very creative guy. His Mother, Linda Apple is also an artist. Together, they had an art gallery. We used to host some lovely parties and events at the art gallery. Some of my fondest memories of living here include our fabulous parties and my neighbors who all worked together to plan and execute such fun events.

After a few years, John and Elizabeth (Even Elizabeth thinks outside the box-she runs a Matchmaking service! http://www.datingdirections.com) bought a different house and Linda moved in next door to me. Linda was really amazing to live next door to! She loves to sit outside and paint. Each day she would complete a small painting. I really enjoyed seeing her create such whimiscal portraits and would pop over as often as possible to visit and chat as she painted. I loved getting a preview of that day's creation. Some were realistic- (bicycles seemed to sell really well!) folks carrying out their every day life, people looking at art in galleries, or animals that owners had commissioned her to make.
Go here to view her daily painting! 

While some of Linda's paintings were realistic, others where more fanciful and imagainative where she would create characters or jolly representations of times past made a little better with bright cheery colors and delightful details.

NOW John and Linda have paired up to make a children's book entitled "Black Cats get a Bad Rap"
You can buy it here: Black Cats get a Bad Rap

Here's John's website with even more information on the book and more illustrations!
http://jgpiper.com

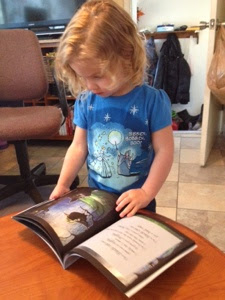
Lily checking out our copy of Black Cats get a Bad Rap
I ordered us a copy right away!  The story is in rhyme each page matching a special cat picture.

"I'm a black cat who wore a witch's hat. They saw I was part of a curse. I say I just got caught up in a verse."
If you or someone you know loves cats, this is a great book to share with them. The illustrations are so delightful. It is even more so for me because I can just imagine Linda on her front porch with her small dog nearby creating each one. 


Lily enjoys the all the cats and kittens.

Saturday, April 5, 2014

Zu-Corny Biscuits via Trader Joe's Cookbook

Did you know there are SEVERAL cookbooks out that feature food from Trader Joe's? Many books will tell you what to buy at their fun store and then how to turn those into a yummy meal, snack, sandwich or even something to pack for lunch!


I found this book:  Trader Joe's Pack a Lunch at the library. Hmmmmmm I love Trader Joe's (though I sure wish they had a location closer to us-both locations take planning to go there.)
I found a recipe called "Zu-Corny Biscuits"   As in-Zucchini and Corn Biscuits. Wow! This combines three things that I love: Zucchini, Corn and baking biscuits!!

Gotta try this!

 Dry mix


Grate zucchini and add it into the "wet" mixture


Wet and dry combined.

Here's a video of me showing the various ingredients:
(And the Book!)


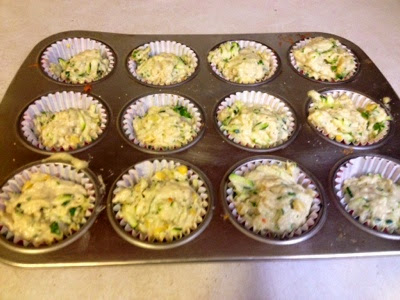
Before I pop them into the oven.

Tips- make sure you have the correct oven temperature! I had the oven set at 350 degrees. However, the recipe calls for 400!  It took twice as long! I couldn't figure out WHY they weren't getting done.
Oh! Yeah, read the recipe!


Here is one of the Zu-corny Biscuits. They have been an easy, take along type snack the past two days. I think I will make it again and if so I will: 
1. Get the cheese recommended in the recipe. Muenster is too mild and the flavor is completely lost.
2. Use more onions, more zucchini and more kale. And more corn too! I would definitely UP the veggie factor. 
These are fast and easy to make and would be PERFECT for a brunch or work event. You can easily make them ahead of time (but let's face it who doesn't love that "hot out of the oven" taste? 
They keep well and would definitely work well packed for lunch. (I should know! I packed two for myself at work!!)  

Hope you try this recipe. 
:)

Tuesday, April 1, 2014

Garden seedlings 2014 and Thrift Stores!

A My husband is the KING of thrift stores. He finds the most amazing things in their aisles.
This year we found me everything in the first two pictures. Trays, a "Germination Station, pots, peet pellets and more. All ready for use!!


All goodies found at the local thrift store

This has a heating pad you can plug in and place underneath. All the parts were there!

Some of the flowers I hope to grow from seed. I chose about 1/2 Perennial and 1/2 Annual

Veggies from SeedsNow.com
www.seedsnow.com
This website sells Non-GMO, heirloom seeds. The packets are small but only $.99!  Besides- Other than a farmer who needs 300 seeds?  The packets I had came with more than enough seeds and it came with mylar light protective sleeves for storing extra seeds. I'm real happy with their website and the speed of delivery!


I use the book "Square Foot Gardening" for our vegetable garden. It worked really well last year.
Book: Square Foot Gardening


1/2 compost, 1/3 Peat and 1/3 Vermiculite
The trick to mixing the different types of soil (1/3 compost- 2 40 pound bags of compost-two different kinds!) 1/3 peet, and 1/3 Vermiculite is to pour it all onto a large tarp. It's easiest to do with two people but I was home alone so I had to improvise. You fold the tarp back and forth turning over the soil. You are trying to mix it all together and then you can slide the tarp to your garden area and dump it off.

After mixing

VEGGIES!!

Veggies and some flowers

Miss Lily Belle wanted to help.

FLOWERS!!

Seed station!  Top of the fridge provides warmth, enough sun and safety from two cats and a toddler!

UPDATE:
Alyssum seeds already sprouting!!

Thursday, March 27, 2014

Pumpkin Pie Muffins

While at the library, I spotted this cookbook. I like to find books that have recipes that Lily might enjoy helping me make AND like to eat.  I found a Pumpkin Pie Recipe and was excited because it calls for Whole Wheat Pastry flour.  If you saw yesterday's post Mac and Cheese with Quinoa Noodles You remember that I had been looking for this flour and wanting to find recipes that call for it.
So! To find a recipe that needs whole wheat flour and the can of pumpkin puree I had in my pantry made me go for it!!


Amazon.com has the book for purchase. I found this copy at the library. I may have to buy it..

First up, mix the dry ingredients:

1 cup all-purpose flour
3/4 cup whole wheat pastry flour
1 1/4 cup sugar
1 1/4 teaspoon baking powder
1 teaspoon cinnamon
1/2 teaspoon salt
1/2 teaspoon ground nutmeg
1/2 teaspoon ground cloves
1/2 cup raisins.

Combine wet ingredients:
2 large egg, lightly beaten
1 cup canned pumpkin puree
1/3 cup canola oil (I used vegetable oil)
1/3 cup water
2 tablespoons raw pumpkin seeds. (I didn't have any so I skipped this ingredient)


Add pumpkin mixture to the flour mixture and stir until just blended. Spoon into muffin cups. I use an ice cream scoop for the easiest distribution.


Bake 20 mintues at 350. Muffins are done with a toothpick comes out clean. 
(Our oven is woefully slow….my muffins took 30 minutes)

The recipe made 19 muffins. On the second batch, add some water to the empty cups. This will help the muffins bake more evenly.


Lily Belle just had to hold the pedestal


Wednesday, January 22, 2014

Is freezing Pesto Basil worth it?


Last summer I decided to grow Basil. For the first time ever, I tried making Basil Pesto and it was just about the best thing I had tasted in years. I couldn't wait to make more! So, I planted two Basil plants in my square foot garden. I nurtured them and took great care in cutting leaves in such a way that it would propegate and make more and more leaves. (Thank You Pinterest)

Here's how to propagate your Basil so it grows into a wonderfully huge, bushy plant. Save this tip for summer!
Basil-pruning-tutorial

Just a little shout out for my sweetie-we did research and then he made me an amazing Square Foot garden similar to this website.  (more posts on this later)
Square Foot Garden "I can totally make that"

I enjoyed lots of Pesto all summer long. When Fall arrived I had two large plants left and I couldn't bear to let the leaves go to waste. The big question was-is it worth it to freeze pesto? I'm here to tell you that on this FRIGID day in Jan with -0 temperatures and snow IT WAS WORTH IT! I made a big batch of pesto and then put it into an ice cube tray. Once frozen, I put the cubes into Mason jars and popped them into the freezer. Now, when I feel like having a little pasta, I pop a cube into a small dish and in an hour or so it has thawed perfectly and I mix it into freshly boiled pasta. SO worth it. And every bit reminds me of last summer and my cheerful little garden.

UPDATE: Today is April 3rd and yesterday I just finished the LAST cube of Basil Pesto that I had frozen last summer. It was still delicious, flavorful and WORTH the effort. This summer, every time I make pesto I'm going to make extra and freeze it. I will freeze every last bit!!  It was completely worth it. So nice to have something of summer to enjoy all chilly winter long.