LilyBakes

Look for us on Facebook! LilyBakes. Please "Like" us today!

Saturday, May 3, 2014

How to-No Knead Bread

I first saw this recipe on Pinterest. Here is the link: No Knead Bread
I do it slightly different.

No Knead bread is really easy to make. NO kneading for 10 minutes. The hardest part of this yummy, crusty bread is TIMING.  If you want to have bread with your dinner, you would have to get up really early to begin it as it needs to sit for six to eight hours. Because I work nights, what I do is start my bread before bed.  Then, I can let it do it's work while I'm sleeping! In the morning, when my dog wakes me up for breakfast, I do the second step (the second rising) and then when I get up for good it's almost ready to go into the oven.


This recipe calls for bread flour. It's important to use BREAD flour. This recipe calls for very little yeast and so you need the bread flour to help make it rise. Trust me-I have experimented with regular flour and it's a mess.

Ingredients:
3 Cups of bread flour
1/4 teaspoon of yeast
1 teaspoon of salt
1 cup and 1/2 lukewarm water


Next, you add 1 cup and 1/2 of lukewarm water. Cold water doesn't work very well. I measure out the water first, do something else and then I come back later and mix in the water.


Mix the dough until it's shaggy. It will not be smooth, or all connected. That's fine. Just mix the water in but don't over mix.


Cover tightly with plastic wrap and set in a warm spot for 6 to 8 hours.


After 6 to 8 hours (it's OK if you don't get to it RIGHT at 8 hours.)  It will have risen and have some air bubbles.


Put some flour down. Dump the dough out onto the flour. Sometimes it sticks a bit to the bowl. Gently nudge out the dough without breaking the bonds too much. Your goal here is to coat the outside with flour. (This will make the delicious crunchy crust!) Get your hands wet so the dough doesn't stick. Fold it over and tuck the ends under making a nice round loaf.  Put in a clean bowl and set back with the plastic wrap lightly on top.  
(Here is a difference between me and the Steamy Kitchen. They recommend putting the loaf on Parchment paper. I have never had luck with parchment paper. It sticks too much and ruins the nice shape.)  
Now, here's another TIMING thing. You set this bowl back for two more hours. 
After an hour and a half, you turn on the oven to 450 degrees. Put the covered dish into the oven for the last half hour. It has to get good and hot.  


I got mine at Crate and Barrel 
A Dutch oven would work too. You have to make sure your covered dish has a lid and can handle the high heat for almost an hour and a half. (in total- heating time and baking time)


After 30 minutes, (USE TWO OVEN MITTS!) to pull out the casserole dish. Turn the bowl over and coax the loaf into the casserole dish. Again, it may stick a bit-try and coax it out and keep the shape as much as possible. If it looks like a weird stick blob (see photo above!!!) don't worry because in the end it will be beautiful!
Bake for 30 minutes with the lid on.


After 30 minutes remove the lid. The bread is a light golden cover. Bake for another 15 minutes with the lid off till the crust is at the desired doneness.


Here is the beautiful, crusty, delicious, light and flully loaf. It's a big hit in our house and does not last long!!  

Wednesday, April 30, 2014

Salad of the Day-Grape Tomatoes

 Today's Sala of the Day!!

I found Organic Grape Tomatoes at the local co-op. They looked juicy and flavorful. I made my salad with zucchini, finely chopped Purple Kale, couscous, cheddar cheese, purple cabbage, shredded carrots and the lovely grape tomatoes.


I topped off the salad with homemade croutons! I used the heel of my just made No Knead bread!  (Tear into pieces, drizzle with olive oil and sprinkle with Parmesan cheese. Toast in toaster oven till brown and crispy!)

Enjoy!!!
I am enjoying the hunt for different, colorful and yummy ingredients for my salads!


Monday, April 28, 2014

Salad of the Day-Sprouts!

Since we are now in the lovely season of Spring (FINALLY! What a long, hard winter that was!!) I am craving salads. Since I did the "Salad of the Day" post, I have been wondering what I could put on my salads to make them different. So I went to my local co-cop: Clintonville Community Market


I found these amazing sprouts! I see these added often to high end dishes featured in fancy restaurants. I'm not even sure what they are called! (more research on that soon Also, instead of slicing carrots I decided to add fresh grated carrots.


I decided to add a few slices of cucumber and small slivers of Cheddar Cheese.


The final touch is homemade Croutons!! I made these with a piece of whole wheat bread. I tore up a piece of bread, drizzled it with Olive Oil (more olive oil that I used two days before!) and then sprinkled with Parmesan Cheese. I put them into the toaster oven on "Broil and Fan" Finally I added some Goddess Dressing and my beautiful, colorful salad was ready!! I have to say that this salad is especially filling. I eat it slowly over a 7 hour shift while I'm at work. I am very full, and sated. I don't want for junk food, candy or sweets. I love getting my vitamins and minerals each day in a colorful, delicious salad. If you have some unique salad toppings, feel free to add comments and share!

UPDATE! After doing a bit of searching, I discovered these are probably Alfala Sprouts

Sunday, April 27, 2014

Pineapple Upside Down Cake! (From SCRATCH!)


The pineapple Beauty!!

For some reason while at work I decided to look for a Pineapple Upside Down Cake recipe. I had a fresh pineapple sitting at home waiting to be used and thought this might be a good way to use some of it.
(of course I can always use it in smoothies or with my Juicer!!)

Then, this evening after work our neighbors called and said they were having people over to cook out. I knew time was short but I decided to put this together and start it in the oven. We were close enough that I could pop over after 45 minutes and pull it out. (And my stepson was home to keep an eye on it for me.)  So I thought why not go for it?
I wanted to use fresh pineapple and I did not want to bake with a cake mix. I had to look at a few recipes before I found this one: Pineapple Upside Down Cake


First I started by preparing the pineapple. (which is actually pretty easy!) You need a large, sharp knife.
First you slice off the top. Then, you cut down each side leaving as much pineapple as you can but making sure to get off all the outer husk.   


Then, slice the pineapple and cut out the core. A VERY small cookie cutter would work well for this. Since I couldn't find a tool that would do what I wanted, I just used the knife. (If you wanted to use canned pineapple rings they would also work very well-and would be uniform!) 

Now to make the cake. 


Ingredients:


Now to make the cake. First, melt a stick of butter and measure out 2/3 cup of firmly packed brown sugar.


Mix the brown sugar into the melted butter. Pour that mixture into the bottom of a well buttered cake pan. (I used a round one) Press the pineapple slices onto the butter/brown sugar mixture.


For the dry ingredients mix the flour, salt, baking powder and cinnamon in a bowl. Set aside.

This next section is copied directly for the recipe. 
In a large mixing bowl, cream the softened butter with the sugar until the mixture is light and fluffy. Add the eggs, one at a time, beating well after each addition. Stir in the vanilla. Add the flour mixture in three parts alternately with the milk, beginning and ending with the flour mixture. Beat well after each addition. Spread the batter evenly into the prepared pan. 


Here is the batter on top of the pineapples.


Here I am. (DORK!)  lol I was so excited to bring over my yummy dessert to share with friends!


Folks reactions were quite promising! I didn't have a cherry to put into each pineapple ring but noone seemed to care!  And I can report that the cake is 100% GONE! I got only one slice!  There was one slice left when we left but we brought that home so Calvin could eat it. After all, he kept an eye on the oven for me!  :)

Overall, it was a GREAT first Upside Down Cake from scratch. :)
I think the next time I have a party or event to go to I will make another one!!


Friday, April 25, 2014

Salad of the Day: Croutons in 10 minutes or less!!


SALAD OF THE DAY!!
For today's salad, I had lots of the same ingredients in the salad I made two days ago. However, I wanted to add more photos today AND add something to the mix. I used the last two slices of my homemade bread for a tunfish sandwich. As I contemplated how to make my salad different I noticed the heel of my loaf and thought, "hmmmmm.......croutons!!"


I tore up the heel into chunks, drizzled olive oil and sprinkled them with Sea Salt. I put the bread into the toaster oven on "Broil and Bake" for about 10 minutes. While those were working, I continuted with making my lunch.


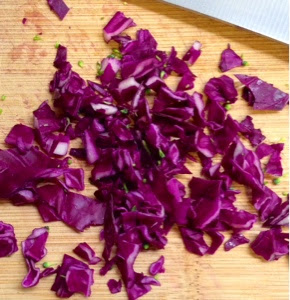
The red cabbage is so beautiful and vibrant I HAD to add it again. I liked it so much I even chopped a little extra to add into the tuna.

My GORGEOUS salad so far. Adding the color makes it so lovely I can't wait to eat it1! The salad so far contains lettuce, more of the couscous I made yesterday, and the red cabbage.


hmmmm croutons! It only took 10 minutes to have croutons! I tested one and for future making-I would add MORE olive oil and also sprinkle with Parmesan Cheese. However for this first attempt (and because I totally just winged it!!) I am pleased!!


The finished salad. Carrots, lettuce, cheddar cheese, celery, red cabbage, Israeli couscous, and the croutons complete the salad. I added a biggish dollop of Godess Dressing and this is a delicious salad that I can't wait to eat!!

Salad Porn!

Next up: Tuna salad sandwich. I used extra of the celery, red cabbage and slices of cheddar cheese. I loaded the tun onto the last slices of the White Loaf Bread made a few days ago. Another part of my lunch that I can't wait to eat!!

Finished sandwich. Yum!!!

All packed up and read to go! I added in a pear and apple. I have a rule: If I am craving sugar or something from the vending machine-I have to eat at LEAST one of these fresh fruits. If I'm still really craving junk food then I allow myself to look. So far, when I do this I'm no longer hungy. (Good rule, huh!?!)

Salad of the Day

Salad Porn!
Close up of all the goodness.


One has to pack SOMETHING for lunch. Since I work nights really it's my "dinner" but I still call it lunch. You pack your lunch so I call it lunch. Here's what I took for "lunch" on Wednesday night.


carrots, celery, zucchini squash and more!
I LOVE to make salads when the weather is warm and sunny. Last year, by taking salads to work everyday I lost 10 pounds. The KEY is to add only a little bit of dressing and leave the bottle AT HOME!  You need a lot less than you think and if you can't add more you save yourself the temptation to do so. Periodically, when I have an extra yummy salad, I will share.  If you have a delicious salad combination-let me know! I would love to find new and exciting things to add!!


Goddess Dressing from Trader Joe's. YUM!


Salad Ingredients:

Leaf lettuce
string cheese cut into bite size pieces
couscous (adds fiber!)
raisins
carrots
celery
zucchini squash (this veggie is amazing raw-did you know that?)
red cabbage
cucumber.

"TIP OF THE DAY;
If I am making a juice to take to work to drink, as I'm preparing the veggies for that, I go ahead and cut some of them up for a salad. Even if I'm not ready to put my full salad together, I have ready the tin I like to use for packing my lunch and will put the chopped up veggies in there. Then, I just pop it into the fridge and later when I'm getting ready for work I just add some lettuce, cheese and dressing and then I'm all ready to go!!

Black Cats get a Bad Rap


For five years I rented a duplex before I got married. A wonderful couple named John and Elizabeth  used to rent the same duplex before they moved out and bought the house next door. John is an artist and a very creative guy. His Mother, Linda Apple is also an artist. Together, they had an art gallery. We used to host some lovely parties and events at the art gallery. Some of my fondest memories of living here include our fabulous parties and my neighbors who all worked together to plan and execute such fun events.

After a few years, John and Elizabeth (Even Elizabeth thinks outside the box-she runs a Matchmaking service! http://www.datingdirections.com) bought a different house and Linda moved in next door to me. Linda was really amazing to live next door to! She loves to sit outside and paint. Each day she would complete a small painting. I really enjoyed seeing her create such whimiscal portraits and would pop over as often as possible to visit and chat as she painted. I loved getting a preview of that day's creation. Some were realistic- (bicycles seemed to sell really well!) folks carrying out their every day life, people looking at art in galleries, or animals that owners had commissioned her to make.
Go here to view her daily painting! 

While some of Linda's paintings were realistic, others where more fanciful and imagainative where she would create characters or jolly representations of times past made a little better with bright cheery colors and delightful details.

NOW John and Linda have paired up to make a children's book entitled "Black Cats get a Bad Rap"
You can buy it here: Black Cats get a Bad Rap

Here's John's website with even more information on the book and more illustrations!
http://jgpiper.com

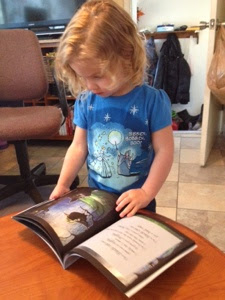
Lily checking out our copy of Black Cats get a Bad Rap
I ordered us a copy right away!  The story is in rhyme each page matching a special cat picture.

"I'm a black cat who wore a witch's hat. They saw I was part of a curse. I say I just got caught up in a verse."
If you or someone you know loves cats, this is a great book to share with them. The illustrations are so delightful. It is even more so for me because I can just imagine Linda on her front porch with her small dog nearby creating each one. 


Lily enjoys the all the cats and kittens.