LilyBakes

Look for us on Facebook! LilyBakes. Please "Like" us today!
Showing posts with label recipe. Show all posts

Thursday, August 14, 2014

Stir Fried Rice and Eggs a la Jessica Seinfeld


I really like Jessica Seinfeld's cookbook "The Can't Cook Book"

She has many delicious recipes that are SIMPLE to make. She walks you through so you feel like a pro and in the end you realize-"Hey, that was easy I totally rocked that!!"  This recipe uses a similar technique to her Huevos Rancheros that I made on August 2nd. (BEST BREAKFAST EVER!) 


Start by making bacon. I always look for Uncured Bacon as Nitrates aren't good for you and it tastes the same as regular bacon.  When done, remove bacon but leave the drippings and the stuff on the bottom of the pan. 


The recipe calls for "leftover" brown rice. I had leftover rice from the Chipotle Rice That I made on August 12th. I hadn't added the Lime Juice to the left over rice so it is just white rice with Cilantro. 


Add rice into the skillet. Add 1 to 2 tablespoons of soy sauce and mix. 
Scrape off the bacon bits on the bottom of the pan. (This is not a diet breakfast!) 


Next, add some cleaned, dried Spinach leaves. 
Cover until they wilt (1 to 3 minutes) then fold the spinach into the rice.


Next, make "wells" for your eggs. I made one for me and one for the Tot.  
Cover and cook till the whites are set and the yolks are soft to the touch. (3 to 5 minutes)


Add salt and pepper, crumbled bacon, and enjoy!!


Here is The Tot's plate. She doesn't like "seaweed" (spinach) but she liked the rice and bacon and egg.
While she didn't eat it all, she ate enough that I think she would enjoy it again. (But I'll keep making it with the "seaweed" as I want her to learn to like leafy greens!

COMMENT-I have to say I liked this but not as much as the Huevos Ranchers. Not by a long shot. I think this would benefit from some Salsa or fresh chopped Cilantro (I think everything is better with Cilantro….) It's a good way to use left over rice and I ALWAYS love eggs so I think I will make it again. I don't know why but "Mango Chutney" sounds like it would be a good addition.  (I guess I better learn how to make that…..)


Tuesday, May 6, 2014

Potato Fingerling Breakfast Pucks

Recently, I went into my local co-op and found these fingerling potatoes. I was excited because they were yellow and redskin! I imagined the fun things I could make with them! So, one night my husband made AMAZING hamburgers and we had these potatoes on the side. (bake on a cookie sheet with a little olive oil and salt) The next morning, there were a few left over. I decided to make them for breakfast and Ta Da! "Breakfast Pucks" were born.


Slice the fingerling potatoes into small disks. Pour Extra Virgin Olive Oil into a skillet. Lay out the potatoes and then lightly coat with salt, pepper, dill, and parmesan cheese.


Next, chop up some fresh Cilantro or Parsley. Most folks would use Parsley but at the moment I'm obsessed with Cilantro!


Cook till one side is golden brown and then turn over.


Add a little bit more parmesan cheese and plate along with some scrambled eggs. YUM!

Sunday, April 27, 2014

Pineapple Upside Down Cake! (From SCRATCH!)


The pineapple Beauty!!

For some reason while at work I decided to look for a Pineapple Upside Down Cake recipe. I had a fresh pineapple sitting at home waiting to be used and thought this might be a good way to use some of it.
(of course I can always use it in smoothies or with my Juicer!!)

Then, this evening after work our neighbors called and said they were having people over to cook out. I knew time was short but I decided to put this together and start it in the oven. We were close enough that I could pop over after 45 minutes and pull it out. (And my stepson was home to keep an eye on it for me.)  So I thought why not go for it?
I wanted to use fresh pineapple and I did not want to bake with a cake mix. I had to look at a few recipes before I found this one: Pineapple Upside Down Cake


First I started by preparing the pineapple. (which is actually pretty easy!) You need a large, sharp knife.
First you slice off the top. Then, you cut down each side leaving as much pineapple as you can but making sure to get off all the outer husk.   


Then, slice the pineapple and cut out the core. A VERY small cookie cutter would work well for this. Since I couldn't find a tool that would do what I wanted, I just used the knife. (If you wanted to use canned pineapple rings they would also work very well-and would be uniform!) 

Now to make the cake. 


Ingredients:


Now to make the cake. First, melt a stick of butter and measure out 2/3 cup of firmly packed brown sugar.


Mix the brown sugar into the melted butter. Pour that mixture into the bottom of a well buttered cake pan. (I used a round one) Press the pineapple slices onto the butter/brown sugar mixture.


For the dry ingredients mix the flour, salt, baking powder and cinnamon in a bowl. Set aside.

This next section is copied directly for the recipe. 
In a large mixing bowl, cream the softened butter with the sugar until the mixture is light and fluffy. Add the eggs, one at a time, beating well after each addition. Stir in the vanilla. Add the flour mixture in three parts alternately with the milk, beginning and ending with the flour mixture. Beat well after each addition. Spread the batter evenly into the prepared pan. 


Here is the batter on top of the pineapples.


Here I am. (DORK!)  lol I was so excited to bring over my yummy dessert to share with friends!


Folks reactions were quite promising! I didn't have a cherry to put into each pineapple ring but noone seemed to care!  And I can report that the cake is 100% GONE! I got only one slice!  There was one slice left when we left but we brought that home so Calvin could eat it. After all, he kept an eye on the oven for me!  :)

Overall, it was a GREAT first Upside Down Cake from scratch. :)
I think the next time I have a party or event to go to I will make another one!!


Saturday, April 5, 2014

Zu-Corny Biscuits via Trader Joe's Cookbook

Did you know there are SEVERAL cookbooks out that feature food from Trader Joe's? Many books will tell you what to buy at their fun store and then how to turn those into a yummy meal, snack, sandwich or even something to pack for lunch!


I found this book:  Trader Joe's Pack a Lunch at the library. Hmmmmmm I love Trader Joe's (though I sure wish they had a location closer to us-both locations take planning to go there.)
I found a recipe called "Zu-Corny Biscuits"   As in-Zucchini and Corn Biscuits. Wow! This combines three things that I love: Zucchini, Corn and baking biscuits!!

Gotta try this!

 Dry mix


Grate zucchini and add it into the "wet" mixture


Wet and dry combined.

Here's a video of me showing the various ingredients:
(And the Book!)


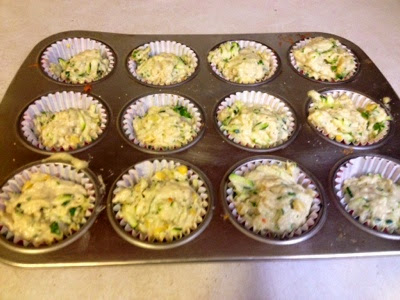
Before I pop them into the oven.

Tips- make sure you have the correct oven temperature! I had the oven set at 350 degrees. However, the recipe calls for 400!  It took twice as long! I couldn't figure out WHY they weren't getting done.
Oh! Yeah, read the recipe!


Here is one of the Zu-corny Biscuits. They have been an easy, take along type snack the past two days. I think I will make it again and if so I will: 
1. Get the cheese recommended in the recipe. Muenster is too mild and the flavor is completely lost.
2. Use more onions, more zucchini and more kale. And more corn too! I would definitely UP the veggie factor. 
These are fast and easy to make and would be PERFECT for a brunch or work event. You can easily make them ahead of time (but let's face it who doesn't love that "hot out of the oven" taste? 
They keep well and would definitely work well packed for lunch. (I should know! I packed two for myself at work!!)  

Hope you try this recipe. 
:)

Tuesday, January 14, 2014

Soft Pretzels

Living in the Midwest-we experienced some pretty nasty cold weather and frigid temperatures this winter. One on particularly cold morning, my neice and I decided to make soft pretzels. What could be cozier than the flaky, warmth of a nice soft pretzel?


So we got out my favorite baking cookbook "Kids Baking" by William-Sonoma. The instructions are easy to follow and in the end you and your kids feel like a Rock Star!


This is my niece, Alex helping my daughter Lily roll out pretzel dough. The recipe calls for several steps. First you make the dough, and then you knead for 10 minutes. (The first time we did this we did the kneading by hand. That's a looooonnnnnggggg 10 minutes! The second time we used this recipe i got smarter and used my mixer and the bread making hook) After the bread is kneaded and sits for a while, THEN you get to do the fun part of rolling out the pretzels and twisting their happy little middles.


After you twisted all your pretzels, then you have to boil them in water for 30 seconds each side. This gives it the chewiness. (or maybe the brown outer crust? I'm just making a guess here....) Finally you can bake your doughy friends. Don't be surprised if your family is lined up anxiously awaiting their arrival to the cooling rack!

Here's the recipe:
http://www.williams-sonoma.com/recipe/pretzels.html